SpringBoot源码分析 - 启动过程 基于SpringBoot 2.3.4
main#SpringApplication.run() 1 2 3 4 5 6 7 8 9 10 11 12 13 14 15 16 @SpringBootApplication public class Application public static void main (String[] args) SpringApplication.run(Application.class, args); } } public static ConfigurableApplicationContext run (Class<?> primarySource, String... args) return run(new Class<?>[] { primarySource }, args); } public static ConfigurableApplicationContext run (Class<?>[] primarySources, String[] args) return new SpringApplication(primarySources).run(args); }
先构造SpringApplication实例,再调用run方法。
SpringApplication#构造方法 1 2 3 4 5 6 7 8 9 10 11 12 13 14 public SpringApplication (ResourceLoader resourceLoader, Class<?>... primarySources) this .resourceLoader = resourceLoader; Assert.notNull(primarySources, "PrimarySources must not be null" ); this .primarySources = new LinkedHashSet<>(Arrays.asList(primarySources)); this .webApplicationType = WebApplicationType.deduceFromClasspath(); setInitializers((Collection) getSpringFactoriesInstances(ApplicationContextInitializer.class)); setListeners((Collection) getSpringFactoriesInstances(ApplicationListener.class)); this .mainApplicationClass = deduceMainApplicationClass(); }
deduceFromClasspath - webApplicationType Springboot 项目的程序类型有三种:
WebApplicationType.NONE
WebApplicationType.SERVLET
WebApplicationType.REACTIVE
deduceMainApplicationClass - mainApplicationClass 获取main方法所在Class
1 2 3 4 5 6 7 8 9 10 11 12 13 14 15 16 17 18 private Class<?> deduceMainApplicationClass() { try { StackTraceElement[] stackTrace = new RuntimeException().getStackTrace(); for (StackTraceElement stackTraceElement : stackTrace) { if ("main" .equals(stackTraceElement.getMethodName())) { return Class.forName(stackTraceElement.getClassName()); } } } catch (ClassNotFoundException ex) { } return null ; }
spring-boot的启动主类,一切都是由spring自己推导的,所以我们不要所以然的认为主类是我们传给spring容器的。
SpringApplication#getSpringFactoriesInstances spring-boot :SpringApplication#getSpringFactoriesInstancesspring-core :SpringFactoriesLoader#loadSpringFactories
1 2 3 4 5 6 7 8 9 10 11 12 13 14 15 16 17 18 19 20 21 22 23 24 25 26 27 28 29 30 31 32 33 34 35 36 37 38 39 40 41 42 43 44 45 46 47 48 49 50 51 52 53 private <T> Collection<T> getSpringFactoriesInstances (Class<T> type) { return getSpringFactoriesInstances(type, new Class<?>[] {}); } private <T> Collection<T> getSpringFactoriesInstances (Class<T> type, Class<?>[] parameterTypes, Object... args) { ClassLoader classLoader = getClassLoader(); Set<String> names = new LinkedHashSet<>(SpringFactoriesLoader.loadFactoryNames(type, classLoader)); List<T> instances = createSpringFactoriesInstances(type, parameterTypes, classLoader, args, names); AnnotationAwareOrderComparator.sort(instances); return instances; } public static List<String> loadFactoryNames (Class<?> factoryType, @Nullable ClassLoader classLoader) String factoryTypeName = factoryType.getName(); return loadSpringFactories(classLoader).getOrDefault(factoryTypeName, Collections.emptyList()); } private static Map<String, List<String>> loadSpringFactories(@Nullable ClassLoader classLoader) { MultiValueMap<String, String> result = cache.get(classLoader); if (result != null ) { return result; } try { Enumeration<URL> urls = (classLoader != null ? classLoader.getResources(FACTORIES_RESOURCE_LOCATION) : ClassLoader.getSystemResources(FACTORIES_RESOURCE_LOCATION)); result = new LinkedMultiValueMap<>(); while (urls.hasMoreElements()) { URL url = urls.nextElement(); UrlResource resource = new UrlResource(url); Properties properties = PropertiesLoaderUtils.loadProperties(resource); for (Map.Entry<?, ?> entry : properties.entrySet()) { String factoryTypeName = ((String) entry.getKey()).trim(); for (String factoryImplementationName : StringUtils.commaDelimitedListToStringArray((String) entry.getValue())) { result.add(factoryTypeName, factoryImplementationName.trim()); } } } cache.put(classLoader, result); return result; } catch (IOException ex) { throw new IllegalArgumentException("Unable to load factories from location [" + FACTORIES_RESOURCE_LOCATION + "]" , ex); } }
spring.factories 1 2 3 4 # Auto Configure org.springframework.boot.autoconfigure.EnableAutoConfiguration=\ com.haier.updaterecord.mybatis.plus.spring.boot.autoconfigure.UpdateRecordAutoConfiguration,\ com.haier.updaterecord.core.factory.UpdateRecordServiceFactory
key为spring扩展接口(或声明功能的注解),value为对应的功能实现类的列表
SpringApplication#run 1 2 3 4 5 6 7 8 9 10 11 12 13 14 15 16 17 18 19 20 21 22 23 24 25 26 27 28 29 30 31 32 33 34 35 36 37 38 39 40 41 42 43 44 45 46 47 48 49 50 51 52 53 54 55 56 57 58 59 public ConfigurableApplicationContext run (String... args) StopWatch stopWatch = new StopWatch(); stopWatch.start(); ConfigurableApplicationContext context = null ; Collection<SpringBootExceptionReporter> exceptionReporters = new ArrayList(); this .configureHeadlessProperty(); SpringApplicationRunListeners listeners = this .getRunListeners(args); listeners.starting(); Collection exceptionReporters; try { ApplicationArguments applicationArguments = new DefaultApplicationArguments(args); ConfigurableEnvironment environment = this .prepareEnvironment(listeners, applicationArguments); this .configureIgnoreBeanInfo(environment); Banner printedBanner = this .printBanner(environment); context = this .createApplicationContext(); exceptionReporters = this .getSpringFactoriesInstances(SpringBootExceptionReporter.class, new Class[]{ConfigurableApplicationContext.class}, context); this .prepareContext(context, environment, listeners, applicationArguments, printedBanner); this .refreshContext(context); this .afterRefresh(context, applicationArguments); stopWatch.stop(); if (this .logStartupInfo) { (new StartupInfoLogger(this .mainApplicationClass)).logStarted(this .getApplicationLog(), stopWatch); } listeners.started(context); this .callRunners(context, applicationArguments); } catch (Throwable var10) { this .handleRunFailure(context, var10, exceptionReporters, listeners); throw new IllegalStateException(var10); } try { listeners.running(context); return context; } catch (Throwable var9) { this .handleRunFailure(context, var9, exceptionReporters, (SpringApplicationRunListeners)null ); throw new IllegalStateException(var9); } }
run#prepareEnvironment 1 2 3 4 5 6 7 8 9 10 11 12 13 14 15 16 17 18 private ConfigurableEnvironment prepareEnvironment (SpringApplicationRunListeners listeners, ApplicationArguments applicationArguments) ConfigurableEnvironment environment = getOrCreateEnvironment(); configureEnvironment(environment, applicationArguments.getSourceArgs()); ConfigurationPropertySources.attach(environment); listeners.environmentPrepared(environment); bindToSpringApplication(environment); if (!this .isCustomEnvironment) { environment = new EnvironmentConverter(getClassLoader()).convertEnvironmentIfNecessary(environment, deduceEnvironmentClass()); } ConfigurationPropertySources.attach(environment); return environment; }
关于SpringApplication#run中的args参数 我们在启动SpringBoot时,可以添加命令行参数,如java -jar app.jar –spring.profiles.active=dev 。--spring.profiles.active=dev会传递给main方法,main方法中需要将其传递给SpringApplication#run 方法,
run#createApplicationContext 1 2 3 4 5 6 7 8 9 10 11 12 13 14 15 16 17 18 19 20 21 22 23 24 25 26 protected ConfigurableApplicationContext createApplicationContext () Class<?> contextClass = this .applicationContextClass; if (contextClass == null ) { try { switch (this .webApplicationType) { case SERVLET: contextClass = Class.forName(DEFAULT_SERVLET_WEB_CONTEXT_CLASS); break ; case REACTIVE: contextClass = Class.forName(DEFAULT_REACTIVE_WEB_CONTEXT_CLASS); break ; default : contextClass = Class.forName(DEFAULT_CONTEXT_CLASS); } } catch (ClassNotFoundException ex) { throw new IllegalStateException( "Unable create a default ApplicationContext, please specify an ApplicationContextClass" , ex); } } return (ConfigurableApplicationContext) BeanUtils.instantiateClass(contextClass); }
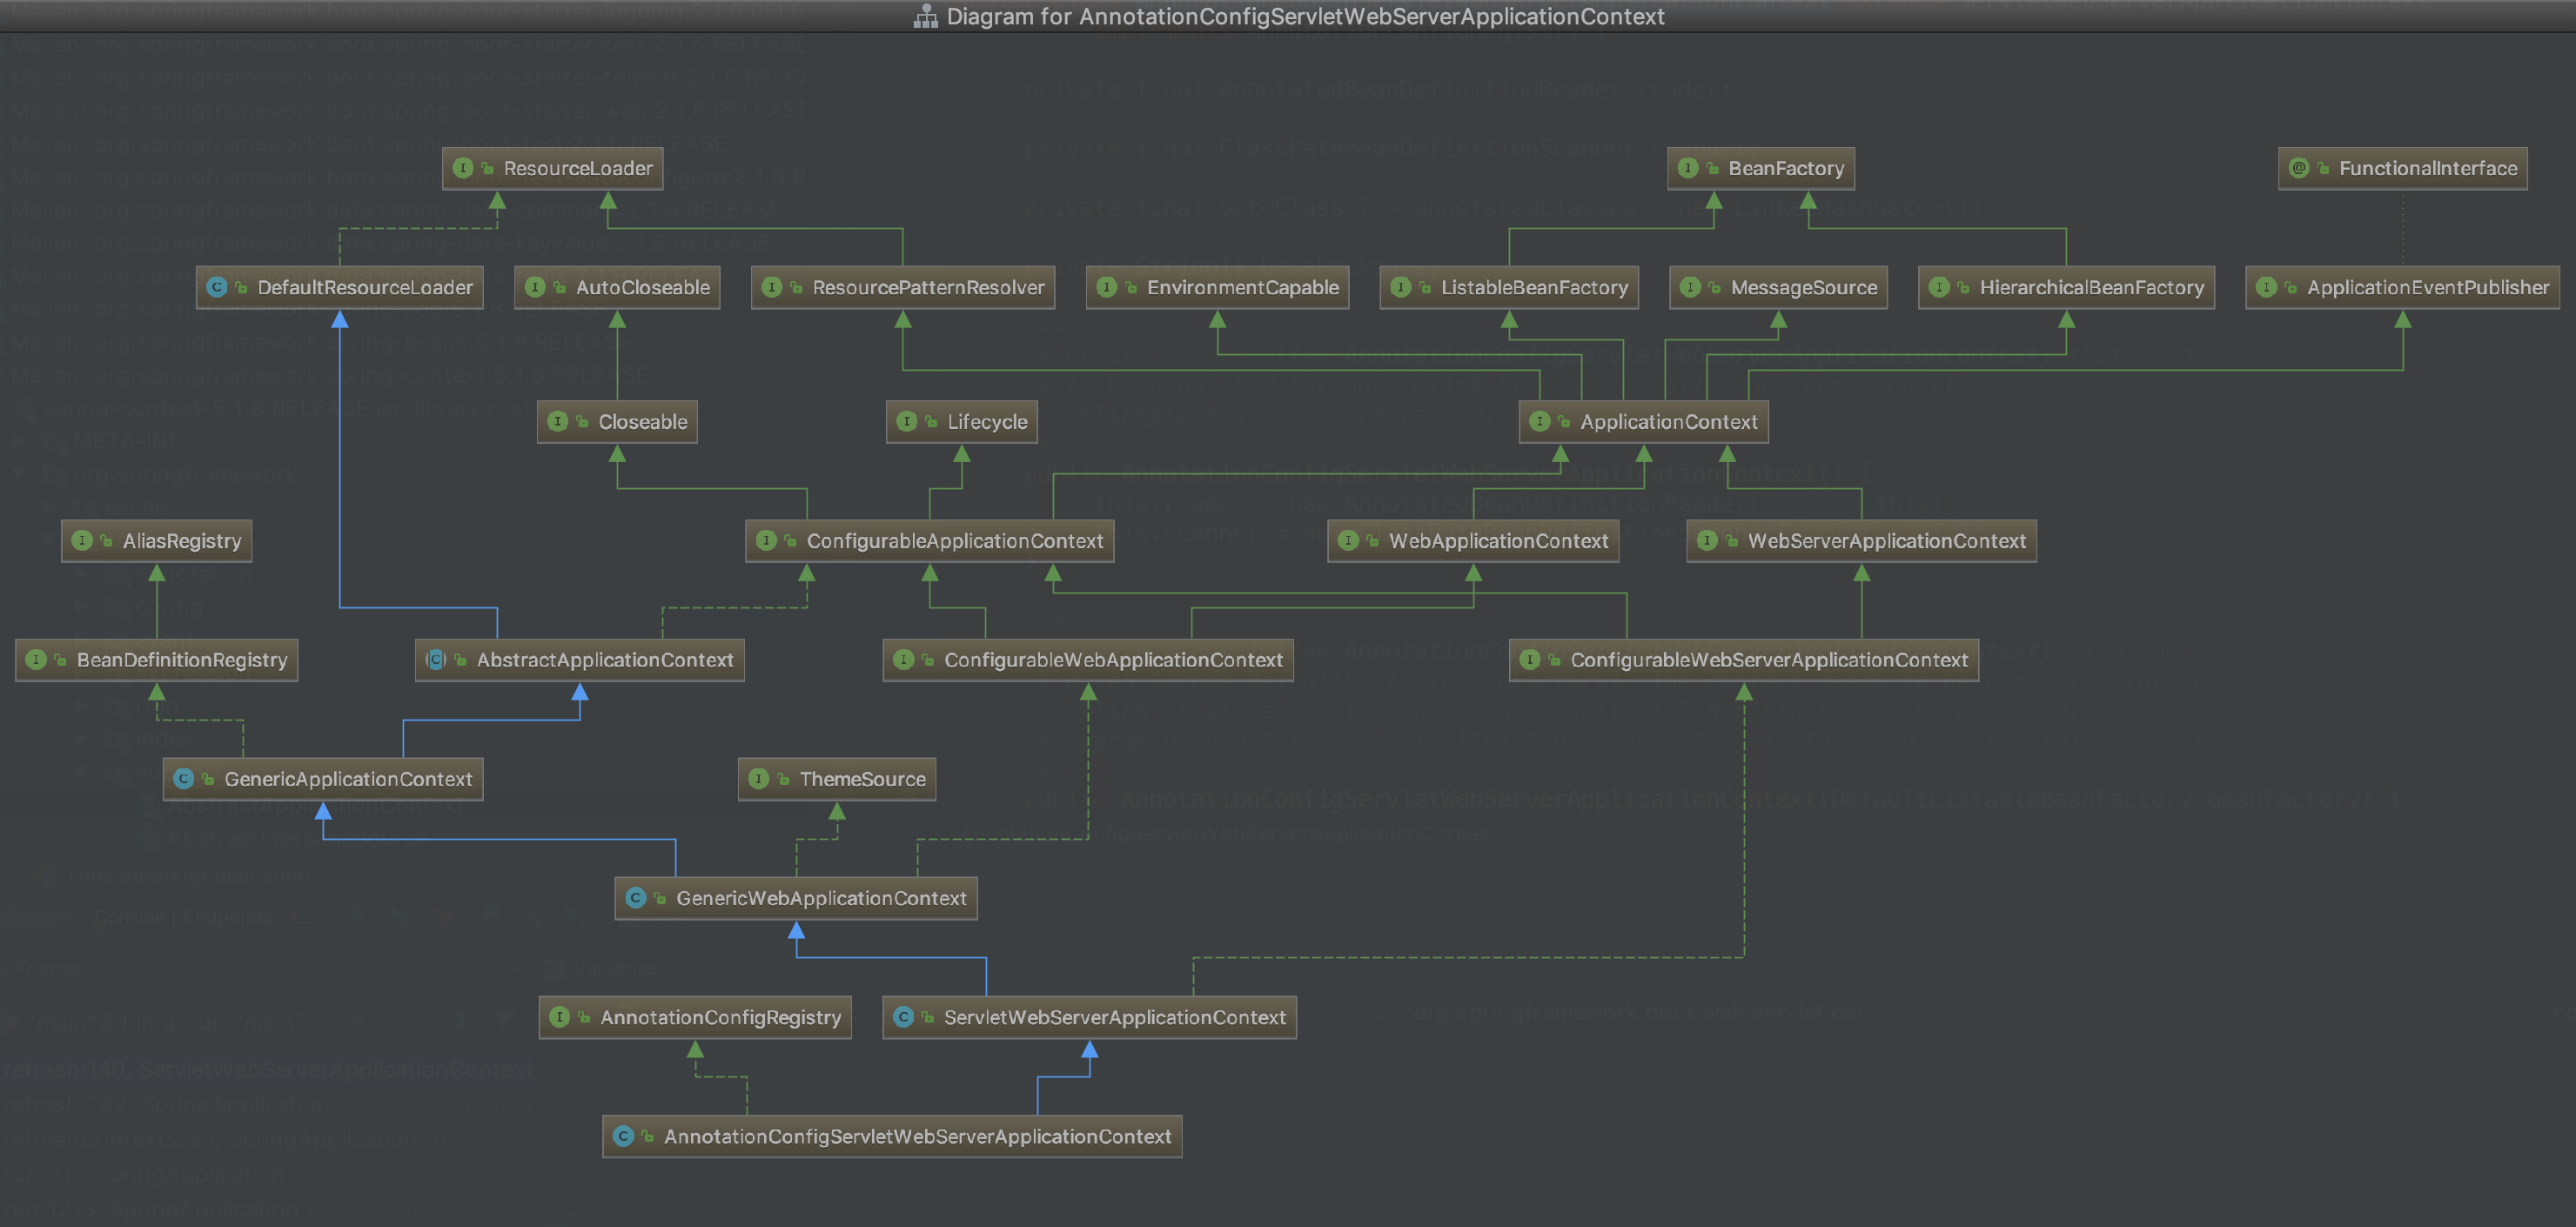
一般我们的SringBoot Web应用 的webApplicationType 为SERVLET ,所以会创建AnnotationConfigServletWebServerApplicationContext 。其父类ServletWebServerApplicationContext,通过ServletWebServerFactory创建并初始化WebServer。
run#prepareContext 1 2 3 4 5 6 7 8 9 10 11 12 13 14 15 16 17 18 19 20 21 22 23 24 25 26 27 28 29 30 31 32 33 34 35 36 37 38 39 40 41 42 43 44 45 46 47 48 49 50 51 52 53 54 55 56 57 58 private void prepareContext (ConfigurableApplicationContext context, ConfigurableEnvironment environment, SpringApplicationRunListeners listeners, ApplicationArguments applicationArguments, Banner printedBanner) context.setEnvironment(environment); postProcessApplicationContext(context); applyInitializers(context); listeners.contextPrepared(context); if (this .logStartupInfo) { logStartupInfo(context.getParent() == null ); logStartupProfileInfo(context); } ConfigurableListableBeanFactory beanFactory = context.getBeanFactory(); beanFactory.registerSingleton("springApplicationArguments" , applicationArguments); if (printedBanner != null ) { beanFactory.registerSingleton("springBootBanner" , printedBanner); } if (beanFactory instanceof DefaultListableBeanFactory) { ((DefaultListableBeanFactory) beanFactory) .setAllowBeanDefinitionOverriding(this .allowBeanDefinitionOverriding); } if (this .lazyInitialization) { context.addBeanFactoryPostProcessor(new LazyInitializationBeanFactoryPostProcessor()); } Set<Object> sources = getAllSources(); Assert.notEmpty(sources, "Sources must not be empty" ); load(context, sources.toArray(new Object[0 ])); listeners.contextLoaded(context); } protected void load (ApplicationContext context, Object[] sources) if (logger.isDebugEnabled()) { logger.debug("Loading source " + StringUtils.arrayToCommaDelimitedString(sources)); } BeanDefinitionLoader loader = createBeanDefinitionLoader(getBeanDefinitionRegistry(context), sources); if (this .beanNameGenerator != null ) { loader.setBeanNameGenerator(this .beanNameGenerator); } if (this .resourceLoader != null ) { loader.setResourceLoader(this .resourceLoader); } if (this .environment != null ) { loader.setEnvironment(this .environment); } loader.load(); }
run#refreshContext 参照Spring源码解析的refreshContext部分。
AbstractApplicationContext#refresh()#invokeBeanFactoryPostProcessors(beanFactory),自动装配在此完成 。
SpringBoot源码分析 - 启动过程 - Tomcat启动 Tomcat和Spring、Spring MVC的关系 为什么默认是Tomcat spring-boot-starter-web最原始依赖的是tomcat。
1 2 3 4 5 6 7 8 9 10 11 12 13 14 15 16 17 18 19 20 21 22 23 24 25 26 27 28 29 30 31 32 33 34 35 36 37 38 39 40 41 42 43 44 <parent > <groupId > org.springframework.boot</groupId > <artifactId > spring-boot-starter-parent</artifactId > <version > 2.3.4.RELEASE</version > </parent > <dependencies > <dependency > <groupId > org.springframework.boot</groupId > <artifactId > spring-boot-starter-web</artifactId > </dependency > </dependencies > <dependencies > <dependency > <groupId > org.springframework.boot</groupId > <artifactId > spring-boot-starter-web</artifactId > <exclusions > <exclusion > <artifactId > spring-boot-starter-tomcat</artifactId > <groupId > org.springframework.boot</groupId > </exclusion > </exclusions > </dependency > <dependency > <groupId > org.springframework.boot</groupId > <artifactId > spring-boot-starter-jetty</artifactId > </dependency > <dependency > <groupId > org.springframework.boot</groupId > <artifactId > spring-boot-starter-webflux</artifactId > </dependency > <dependency > <groupId > org.springframework.boot</groupId > <artifactId > spring-boot-starter-undertow</artifactId > </dependency > </dependencies >
createApplicationContext -> AnnotationConfigServletWebServerApplicationContext 因为我们的应用是 Web Servlet 类型,
refreshContext -> tomcat启动 1 2 3 4 5 6 7 8 9 10 11 12 13 14 15 16 17 18 19 20 21 22 23 24 25 26 27 28 29 30 31 32 33 34 35 36 37 38 39 40 41 42 43 44 45 46 47 48 49 50 51 52 53 54 55 56 57 58 59 60 61 62 63 64 65 66 67 68 69 70 71 72 73 74 75 private void refreshContext (ConfigurableApplicationContext context) refresh(context); if (this .registerShutdownHook) { try { context.registerShutdownHook(); } catch (AccessControlException ex) { } } } protected void refresh (ApplicationContext applicationContext) Assert.isInstanceOf(AbstractApplicationContext.class, applicationContext); ((AbstractApplicationContext) applicationContext).refresh(); } public void refresh () throws BeansException, IllegalStateException synchronized (this .startupShutdownMonitor) { this .prepareRefresh(); ConfigurableListableBeanFactory beanFactory = this .obtainFreshBeanFactory(); this .prepareBeanFactory(beanFactory); try { this .postProcessBeanFactory(beanFactory); this .invokeBeanFactoryPostProcessors(beanFactory); this .registerBeanPostProcessors(beanFactory); this .initMessageSource(); this .initApplicationEventMulticaster(); this .onRefresh(); this .registerListeners(); this .finishBeanFactoryInitialization(beanFactory); this .finishRefresh(); } catch (BeansException var9) { if (this .logger.isWarnEnabled()) { this .logger.warn("Exception encountered during context initialization - cancelling refresh attempt: " + var9); } this .destroyBeans(); this .cancelRefresh(var9); throw var9; } finally { this .resetCommonCaches(); } } } protected void onRefresh () super .onRefresh(); try { this .createWebServer(); } catch (Throwable var2) { throw new ApplicationContextException("Unable to start web server" , var2); } } private void createWebServer () WebServer webServer = this .webServer; ServletContext servletContext = this .getServletContext(); if (webServer == null && servletContext == null ) { ServletWebServerFactory factory = this .getWebServerFactory(); this .webServer = factory.getWebServer(new ServletContextInitializer[]{this .getSelfInitializer()}); } else if (servletContext != null ) { try { this .getSelfInitializer().onStartup(servletContext); } catch (ServletException var4) { throw new ApplicationContextException("Cannot initialize servlet context" , var4); } } this .initPropertySources(); }
SpringBoot源码分析 - 启动过程 - Spring MVC自动配置 即Spring MVC的核心组件DispatcherServlet的注册过程。
1. 自动配置DispatcherServlet和DispatcherServletRegistry
DispatcherServletAutoConfiguration自动配置类
1 2 org.springframework.boot.autoconfigure.EnableAutoConfiguration=\ org.springframework.boot.autoconfigure.web.servlet.DispatcherServletAutoConfiguration
1 2 3 4 5 6 7 8 9 10 11 12 13 14 15 16 17 18 19 20 21 22 23 24 25 26 27 28 29 30 31 32 33 34 35 36 37 38 39 40 41 42 43 44 45 46 47 48 49 50 51 52 53 54 55 56 57 58 59 60 61 62 63 64 65 66 @AutoConfigureOrder(Ordered.HIGHEST_PRECEDENCE) @Configuration(proxyBeanMethods = false) @ConditionalOnWebApplication(type = Type.SERVLET) @ConditionalOnClass(DispatcherServlet.class) @AutoConfigureAfter(ServletWebServerFactoryAutoConfiguration.class) public class DispatcherServletAutoConfiguration public static final String DEFAULT_DISPATCHER_SERVLET_BEAN_NAME = "dispatcherServlet" ; public static final String DEFAULT_DISPATCHER_SERVLET_REGISTRATION_BEAN_NAME = "dispatcherServletRegistration" ; @Configuration(proxyBeanMethods = false) @Conditional(DefaultDispatcherServletCondition.class) @ConditionalOnClass(ServletRegistration.class) @EnableConfigurationProperties(WebMvcProperties.class) protected static class DispatcherServletConfiguration @Bean(name = DEFAULT_DISPATCHER_SERVLET_BEAN_NAME) public DispatcherServlet dispatcherServlet (WebMvcProperties webMvcProperties) DispatcherServlet dispatcherServlet = new DispatcherServlet(); dispatcherServlet.setDispatchOptionsRequest(webMvcProperties.isDispatchOptionsRequest()); dispatcherServlet.setDispatchTraceRequest(webMvcProperties.isDispatchTraceRequest()); dispatcherServlet.setThrowExceptionIfNoHandlerFound(webMvcProperties.isThrowExceptionIfNoHandlerFound()); dispatcherServlet.setPublishEvents(webMvcProperties.isPublishRequestHandledEvents()); dispatcherServlet.setEnableLoggingRequestDetails(webMvcProperties.isLogRequestDetails()); return dispatcherServlet; } @Bean @ConditionalOnBean(MultipartResolver.class) @ConditionalOnMissingBean(name = DispatcherServlet.MULTIPART_RESOLVER_BEAN_NAME) public MultipartResolver multipartResolver (MultipartResolver resolver) return resolver; } } @Configuration(proxyBeanMethods = false) @Conditional(DispatcherServletRegistrationCondition.class) @ConditionalOnClass(ServletRegistration.class) @EnableConfigurationProperties(WebMvcProperties.class) @Import(DispatcherServletConfiguration.class) protected static class DispatcherServletRegistrationConfiguration @Bean(name = DEFAULT_DISPATCHER_SERVLET_REGISTRATION_BEAN_NAME) @ConditionalOnBean(value = DispatcherServlet.class, name = DEFAULT_DISPATCHER_SERVLET_BEAN_NAME) public DispatcherServletRegistrationBean dispatcherServletRegistration (DispatcherServlet dispatcherServlet, WebMvcProperties webMvcProperties, ObjectProvider<MultipartConfigElement> multipartConfig) DispatcherServletRegistrationBean registration = new DispatcherServletRegistrationBean(dispatcherServlet, webMvcProperties.getServlet().getPath()); registration.setName(DEFAULT_DISPATCHER_SERVLET_BEAN_NAME); registration.setLoadOnStartup(webMvcProperties.getServlet().getLoadOnStartup()); multipartConfig.ifAvailable(registration::setMultipartConfig); return registration; } } }
DispatcherServletAutoConfiguration类主要包含了两个内部类,分别是:
DispatcherServletConfiguration
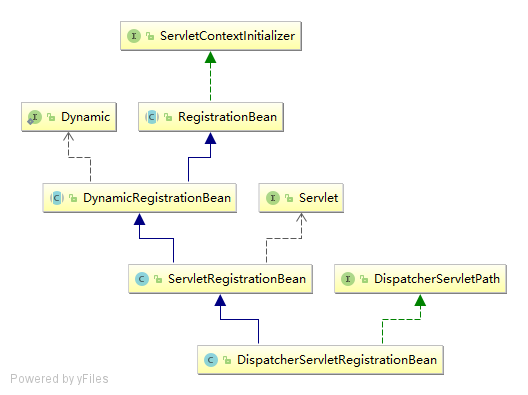
DispatcherServletRegistration Configuration注册类 。DispatcherServletRegistrationBean ,负责将DispatcherServlet给注册到ServletContext中 。
配置DispatcherServletConfiguration
配置DispatcherServletRegistrationConfiguration
2. 注册DispatcherServlet到ServletContext DispatcherServletRegistrationBean负责将DispatcherServlet注册到ServletContext当中。
总的来说,其实就是触发了初始化ServletContext时候的回调接口onStartup方法,而后直接将DispatcherServlet作为一个Servlet给add到ServletContext当中。
3. 初始化mvc的组件
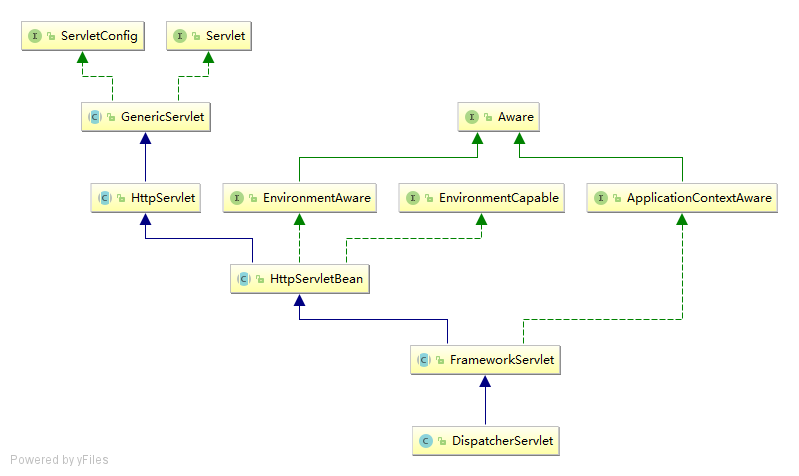
DispatcherServlet作为一个Servlet的实现,在Servlet被调用init方法以后最终将会调用DispatcherServlet的initStrategies方法,该方法将会初始化各个组件。
1 2 3 4 5 6 7 8 9 10 11 12 13 14 15 16 17 18 19 20 21 22 23 24 25 26 27 28 29 30 31 32 33 public class DispatcherServlet extends FrameworkServlet @Override protected void onRefresh (ApplicationContext context) initStrategies(context); } protected void initStrategies (ApplicationContext context) initMultipartResolver(context); initLocaleResolver(context); initThemeResolver(context); initHandlerMappings(context); initHandlerAdapters(context); initHandlerExceptionResolvers(context); initRequestToViewNameTranslator(context); initViewResolvers(context); initFlashMapManager(context); } }


